Easy and Cute Teacher Gift!

Teacher Thank You
Hi!
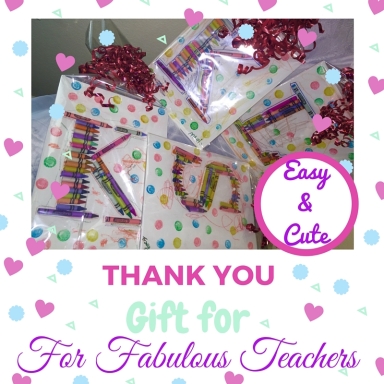
The kids and I got crafty for Teacher’s Appreciation Day and we wanted to share it with you.  I saw this on Pinterest (of course) and had to try.  The post I saw used shadow boxes, but that is way to pricey for my budget so we used canvas instead.  Here is what you need:
  • Canvas (I used 8 1/2 X 12 at $7.99 for a 5 pack)
  • Crayons (2 boxes of 64 count total $3 a box)
  • Glue Gun and Glue Sticks (I already had these)
  • Rope of ribbon of your choosing (I used rope I had)
  • Paint (optional) we used Dot Paint for a pretty finish
Because 3 of the things used are standards in my craft room, we spent a little over $1.50 per gift. Not bad for a days work!
First print or draw the letter you want to use as a guide for your product on a sheet of paper. Copy that same letter onto your canvas.  I cut the printed letter and used it as a stencil so they matched.
Second start arranging your crayons to fit the letter and cut them to size.  I just used a sharp knife, but you can use a small electric saw if you have one and are comfortable using one.  I am not, so I stuck to what I felt comfortable with.
K
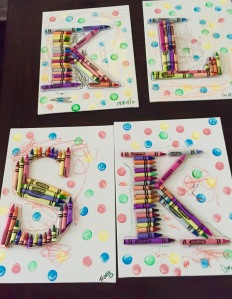
Once you know how you want them, start transferring them over from your sheet to your canvas and gluing them with your glue gun. I recommend doing one at a time. I tried to make a line and quickly setting more than one to go faster, but the glue dried before I could get them over.  Oops!  One at a time works better for me. Because I had to to them this way, I didn’t let the boys use the glue gun this time around.  Way to easy to burn your fingers when you are holding the crayon.  Not much room for error, ask my fingers.

Transfer Letter to Canvas

Once they were dry, I gave the leftover crayons to the boys and they went to town on the canvas. Here is where our Spanish Lesson came in.  We reviewed our alphabet and then named the letters we needed. We reviewed our colors as they picked their crayons and named the ones that were glued.  They also got to count the amount of crayons used. Learn & Play, I say!  
They loved the idea of drawing with crayons around crayons for their favorite teachers.  Sweet Boys!  For the finishing touch, we used the dot paint to make the pictures pop. 
4 letters finished
Once everything was set, I glued a piece of the rope to the top for hanging. Wrapped them up and Ta-Da! Pretty gifts!

Final Teacher Gift

You could do everything in a day (though the cutting was the must time consuming task so be prepared for that).
Hope you like it!  Happy Teacher Appreciation Day to all of the Fabulous Teachers out there Past and Present!  
Hugs to you all! 


Happy Holidays!

This holiday season, I would like to send heartfelt thanks for all of the support you have given Bilinguazo in 2015. I have learned so much from my readers and from my fellow bloggers on Multicultural Kid Blogs and Austin Moms Blog.  I am grateful for my family and friends. You have always lifted me a little higher than I thought I could go. I am, of course, so very thankful for my two little monkeys that have inspired everything that I have written for the last 5 years and for the love of my life for seeing more in me than I ever have. I hope 2016 brings a lot of inspiration to our lives and to helping each other achieve our dreams. I wish you love, good health, happiness and success! I would not be the person I am without each of you! Hugs, dear friends and see you in 2016!

Happy Holidays from my family to yours! ❤️

Mama’s Got A New Job

Look What I Can Do!

This is a Sponsored Post:

When I left retail many, many moons ago, I told myself (and more than likely everyone that would listen) that I would never go back. Well, who’s got that bowl of words for me to eat because I’m going back. I am putting myself back out into the selling game. You will not find me in a store or even in an office (thank goodness.) I have decided to become an independent consultant for Rodan + Fields®.  Have you heard of them?  

After years of contemplation (yes, I said years), I have decided to join my good friend Mary on her team.  To say she has been very patient with me is an understatement. I almost joined her years ago, but backed out of fear of failure. It is a legit fear, but I can’t let it keep stopping me from trying. Now, I have a newfound confidence and determination. I must say, I am still afraid of putting myself out there, but excited to share this all with you and grow with you. Please be nice!

 All of my other endeavors are still in full force, so I will continue on my writing and blogging journeys. I will also be introducing you soon to another little side project that I am having fun putting together. For now I just wanted you to know that this is where my path is taking me.

I promise to not bombard you with posts to BUY, BUY, BUY or JOIN, JOIN, JOIN. I mean I really don’t want to lose my friends! I kinda really like ya! Instead, I will only send things that I am excited about now and then. Just know I will always be here to help you find what is right for you whatever your needs. Bilinguazo will not become a Rodan + Fields promo page, but if you ever need to reach me, you can send me a message here as well. If you do not respond to whatever I send your way, I will not be offended. I promise. I may even give a shout out now and then, but who doesn’t? I am not a socially savvy gal, so you don’t have to worry about me living on social media trying to find new ways to stalk you for your business. That would be exhausting. I don’t have time for that nonsense. (“ain’t nobody have time for that”…name that quote?)

Here comes the selling bit real quick in the purple print: (No worries if you if you decide to to skip the purple.)

  • Rodan + Fields is the 4th leading skincare providers in the country following Clinique, Estee Lauder and Lancome.
  • They offer products for men and women, for every skin type, for every skin problem and just to make you feel pretty (yes, guys like to feel pretty, too, sometimes). They make my skin feel so good! I will and do recommend them to you.
  • If you want to learn about the products or need help finding out what is right for you, I would love to meet up.
  • If you are outside of Austin, we can set up a chat at your convenience.
  • Shipping is free for the US and Canada. 
  • Not in either of these countries? No worries, I will find a way to get it to you.
  • If you choose to become my client, you will get a 10% discount for any purchases without being forced to auto-ship, auto-bill, auto-anything. Order when you like and whatever you like.
  • If you are interested in learning more about the business, I’d love to share it with you.
  • Lastly, we can do this all in Spanish, too, of course! 

I have never been an impulsive person, but I am today. Well I mean if you consider debating back and forth for years being impulsive, that is. So I am jumping in with both feet! Want to learn more? Send me a message and I will get back to you! 

Ok, DONE. This was my Sponsored Post to you, I will try not give you the spiel again (unless you ask). Thanks for reading all the way through.  Keep your fingers crossed!  Hugs! 

FullSizeRender-18 copy

Introducing my business the best way I know how, by getting crafty with a crooked printer (yes it prints things crooked on any sheet) washable glue sticks used at craft time (hope it holds) and a whole lot of love plus cookies! 

Super Easy Halloween Crafts

supersimple

Hello!

Halloween is almost here and my boys couldn’t be more excited! They have been wearing their costumes since we got them for them and have been busy creating some of their own.  We have also been doing my favorite thing…getting crafty! Yep, you can never have too many crafts! Here a few super simple crafts and ideas for your last minute Halloween fix.  

Paper Skeleton Costume

My oldest wanted to be a skeleton one day, so I searched on Pintrest for an easy to make costume and came across a million ideas, of course.  Here are a couple of super easy ideas for the skull and another for the rest of the skeleton.

Skull from Red Ted Arts

What you need:

  • Paper Plate
  • Marker
  • Scissors
  • hole punch
  • Pipe cleaners or something to tie with
  1. Follow the middle circle on a paper plate with your marker to make a horseshoe shape. 
  2. Draw two half circles on both sided of the horseshoe
  3. Draw lines on the grooves at the bottom of the plate for teeth
  4. Draw circles for eyes and an upside down heart for the nose.

FullSizeRender-18 copy 2

5. Punch holes on both sides and tie a pipe cleaner or string through it. 

FullSizeRender-26

Body

For the body I found a printable template on Poofy Cheeks that was perfect.

What you need:

  • printer
  • paper
  • scissors
  • black marker
  • tape
  • kids in dark clothing 

I just printed two for both of my boys and cut out the shapes.  I wasn’t about to cut each individual bone, so I just colored in the blank spaces with a black marker. Perfect for people that want to be a little crafty but don’t have a lot of time.

IMG_0123IMG_0126

I hand drew the arm and leg bones myself so I could make them the right size for my littles.

FullSizeRender-18 copy


Finally I taped them to some dark clothing, added the mask and the skeletons were complete!

FullSizeRender-18

SPIDERS!

I wanted some spiders to hang on our fake spider web, but I wanted them to be extra special. I solicited the help of three very talented artist (aka the fam) and a spider family was born.

What you need:

  • pipe cleaners
  • pom poms
  • googly eyes
  • glue gun (with glue sticks) or regular glue
  • scissors
  1. Cut and shape the piper cleaner to the sizes you want the legs to be.
  2. Let your imagination run wild. Glue the legs to the pom poms and add eyes.DONE! 

FullSizeRender-19

Paper Plate Ghosts

This one is fun for little hands, too!

What you need

  • white paper
  • white paper plates
  • tape
  • white party streamer
  • markers, crayons or paints
  1. Trace your little ones hands or have them do it on a white piece of paper
  2. Cut out hands
  3. Tape the cut outs to the back of the plate where you want the ghosts hands to be
  4. Make the ghosts face with whatever you fancy
  5. Add streamers to the bottom of the plate. Tape to the back of the plate.
  6. Say boo!

IMG_0246IMG_0250

Here are some easy food decorating ideas.

Quesamummy! 

What you need:

Tortillas

  • cheese
  • olives
  • any other filling you would like on your quesadilla
  • edible marker (optional)
  • a stove or microwave
  1. Warm up one tortilla for each person being served
  2. Flip to warm both sides
  3. Remove from heat and cut into strips
  4. Warm up another tortilla for each person being served
  5. Flip
  6. Add your filling. We did ham and cheese.
  7. Let cheese melt and then remove from heat.
  8. Add your strips of tortilla on top leaving enough space to see through and leaving the smallest strip out. 
  9. Cut round pieces of cheese and place where eyes would be
  10. Cut olives in half to make eyes and place on top of round cheese
  11. Draw a smile on the little strip you didn’t use and add as mouth.  Easy peezy! I added tomatoes and cucumbers to the plate just to make it a bit healthier.

FullSizeRender-27

Sandwich Art

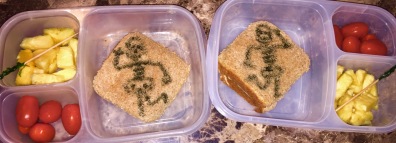
I am that cheesy mom that send decorated sandwiches to school.  Although my art skills could you some work, the boys really enjoy them.  I’ll keep on doing it until they tell me to stop or I don’t find it fun any more, whichever comes first.

What you need

  • A sandwich (duh)
  • edible markers
  1. Draw to your hearts content.  Just remember your canvas is pretty small so don’t try to get to detailed unless you are crazy talented. It’s not easy to show too much on bread. Here are a couple of examples.

FullSizeRender-31

IMG_0144

There you have it.  This is how I’ve been keeping busy these days.  What crafty things are you up to?

HAPPY HALLOWEEN!

Tears and More Tears

Tears and More Tears

Ever since I can remember, my eyes have teared up for pretty much every expression and emotion possible.  They tear up when I laugh too much, when I get a little too excited, when I get mad, when I talk about something sad, when I cough, when I sneeze, when I yawn and, of course when I cry. If someone cries in front of me, chances are, I will cry with them or at least tear up. Have you ever tried to tell a super funny story and have the eyes of the person you are talking slowly start getting bigger and bigger until they look a little scared because your eyes are starting to fill up? Kind of kills the mood.

This especially complicated things in business since the last thing I wanted to be seen as was the stereotypical girl being too sensitive in the workforce. Being a mom, this little uncontrollable response is really hard for me to deal with when disciplining my children. It’s hard to be a rock and/or scold them without having them see the tears forming in my eyes. 

It never occurred to me how this would affect my parenting skills until now that these little sweet boys of mine are rebelling and acting all kinds of wild. I don’t want them to see me as weak, so I try to hold the tears back until I can leave the room. I think I am getting better at that. I guess it’s all about learning control. I will teach this to the boys as the days go on.  This is one thing we will have to learn together…hopefully.

I did forget to mention, however that along with the tears comes the red face. I have never and will never be able to hide the fact that I cried or even just get over it so no one could tell I had been crying. Unfortunately, both boys also inherited this lovely trait from me. Maybe they will outgrow that, but I still haven’t. The red face lasts for a long time and the red eyes linger for hours. It’s exhausting. That is why I try to stay positive as much as I can. Being sad just wears me out. I just hope that if people see my boys sad little faces sometimes they don’t think they are sad all of the time. I don’t really think they will, though, these are two happy and silly little ones.

Going back to the tears, here is a quick little story. The other day, I was cuddling with M and singing the songs we sing at nap time. I yawned in the middle of it, so naturally, I teared up.  He looked up at me a few seconds later and his eyes teared up, too. I asked him what was wrong and he told me I looked sad. I quickly smiled and explained to him that I was not even a little bit sad and that I just yawned. He smiled back and all was good again. Even if my boys did get the teary eyes from me, one thing they show me is that they have good hearts and a whole lot of empathy. If just seeing tears in my eyes made M’s eyes tear up, I think he is learning how to empathize with others. I love seeing my little ones grow.

What traits did your little ones get from you? What have you learned from seeing them in your little ones?

Global Pick of the Day

Your Family Can Help Boost Bilingualism
As part of my Global Pick of the Day and the mark of my one year anniversary as a blogger last week, I picked one of the first posts I did. I had started doing research on all things bilingual and came across some awesome articles. They have given me some great ideas about how to help my children become bilingual. We still use these tips today as well as so many others I have found along the way through the Multicultural Kid Blogs. It’s fun to look back and see where we are now. It also makes me want to try to remember what the baby photo project I mentioned was. I should write things down more often, (words no blogger should say, ha)…
Enjoy!
Please Click here: Your Family can Help Boost Bilingualism

Casa de los Primos

Akumal (2) (300x251)

The beach has always been my magical place. It has been my favorite place to disconnect from real life. There is something about the sound of the waves that can lighten even my heaviest thoughts.  Thankfully we were lucky enough to visit a lovely little beach named Akumal that is found on the Yucatan Peninsula of Mexico about 60 miles from Cancun. The name Akumal means “place of turtles” in Mayan and the name suits it perfectly. The town’s tourism centers on the life of turtles, from birth on. There is a wildlife sanctuary for the turtles, snorkeling tours to watch them in their own habitat and a plethora of decorative turtles and gifts to be bought everywhere you go.

This post focuses on the place we were lucky enough to stay in. It was a beautiful house called Casa de los Primos on the south part of Akumal.

IMG_2728

The house is a 4 bedroom house with an additional guest room separate from the main house that has one room and mini kitchen. It has its own pool and is right on the beach. This is not a post to advertise the house for you to rent, as I have no affiliation to the owners. I just wanted to give you a layout so you can visualize it with me as I show you what struck me most: the artwork and decorations.

knick knacks

The owners (or decorator if they used one) took time to cover almost every nook and cranny with gorgeous and mostly original Mexican artwork. There were sculptures, paintings, weaved artwork, masks, crosses and everything you can think of throughout the house. Here are some of the pieces they had that I wanted to share with you to show you just how beautiful Mexican art really is.


IMG_2769IMG_2774IMG_2765IMG_2759IMG_2742

My boys loved all of the vibrant colors they say there and have since painted with a little more enthusiasm themselves. My oldest picks bright colors for his projects and can draw a beach scene for you with no hesitation. It may be his favorite thing to draw and paint right now, and I love it.

m art

There is something special about art from Mexico that just makes me smile. I am very grateful that this is my culture and that I am able to share it with my kids. Thank you, Mexico, for having such deep pride in the arts. Thank you, Casa de los Primos, for showcasing so much of it. Thank you, Akumal, for inspiring my boys and me to love art, color, nature and life a little more than before.

I hope you enjoyed the art. 

IMG_2766

Have a bright and colorful week.

My Global Pick of the Day!!

Global Pick Image for 4.27.15 Final (2) (600x503)

It is my turn to share one of my first posts with you and the Multicultural Kid Blogs readers.  So I thought I would share with you one of my firsts post dealing with my greatest fear.  It’s not snakes, dark spaces or even heights. I’m pretty good with all of these. What is it then? Public Speaking. Can’t do it, even at my age. What’s a mama to do?

Public Speaking: Not in English or in Spanish, Please.

I hope you enjoy my take on it and I would love suggestions on how to help my little ones avoid this challenge.

Thank you!

public speaking image

Easter Maracas

Featured Image (2) (600x503)

Sorry for the last minute post, but I wanted to share a quick an easy craft for all of those Easter Eggs you may have laying around.

Easter Bunny Maracas

I love the fact that my boys know what maracas are and that when I asked them if they wanted them to make Easter Bunny Maracas for their friends, they were so excited. Everything that I used I already had at home from previous art projects.  I know you can make them match better if you go out and buy supplies in the colors of your choosing, but for this post I used what I had at home.  I hope you enjoy.

What you will need:

IMG_0094

  • Plastic eggs
  • Tape
  • Wire cleaners
  • Plastic spoons
  • Markers

Optional

IMG_0141

  • Eyes
  • Glue Gun

I had some light blue spoons left from M’s first birthday party. Yes, he is 4 and I STILL had the spoons.  I may just be a pack rat.

I also already had some red painters tape left from the boy’s last bday party.

Everything else I had in my craft room already.  They are pretty much standard in my house.

  • First you fill your eggs with whatever you choose. I was lucky enough to find a bag of plastic eggs for sale at Target that were already filled with candy. But if you have some empty eggs you can fill them with uncooked rice or beans. They are perfect for making music.
  • Fold a pipe cleaner into small bunny ears to the size you like. I bent them at one end so I would have plenty left after it was taped to make a tail.
  • Place the egg on the spoon, put the ears into position as well and start taping.
  • Roll the end that is left into a little tail.

IMG_0167

  • Next I glued the eyes onto the egg. If you don’t have eyes, you can have your kids draw some on with either paint or permanent marker.

IMG_0144

My trick for getting the eyes on without accidents or mess is to place the eyes upside down on a hard surface first. Put a dab of glue on the egg. Carefully press down onto the eyes where your glue is to pick up the eyes. This makes it so much easier to do for me and my little helpers.

Once you have it all assembled, you can let your kids draw the faces on.  This was great fun for them.  They don’t really get to play with permanent marker for obvious reasons (mainly because it is impossible to wash, especially on their face).

IMG_0145IMG_0142

There you go, sweet little bunny maracas.  Have a Happy Easter!

IMG_0149IMG_0164

You can make all kinds of little creatures using this same technique.  Stay tune for a follow up post on that.

(If you would like to share my blog, I would be so grateful. You can find it in our new website http://www.bilinguazo.com/blog.html and on Facebook. We are now also on Pinterest. And don’t forget to hit me up on Twitter. Thanks a bunch!)